Delete your existing directory and extract this into it its the newest version with hardware accel back on. I was going crazy i actually installed windows again cause thought was my computer. When i made a platter of like 4 orbiters or 30 cable chain links i could not even get 1 fps and then i couldnt even type while it was open and i running a 5950x with 64gb ram right now so i was really at a loss. But try the gcode viewer or slice preview then do this and try again .
you will not lose your profiles as they are stored in the USERS/AppData/roaming then i think superslicer ALPHA folder but anyway you get the point
but the important part is just to use the reset pins again and then teh reset button . sometimes you can get away onyl doing one or the other but it is safer to do both and make sure you do not have low level configuration checked so if their is a * in front of it then hit spacebar on it to uncheck it.
One is their is new way of defining moonraker.conf it will be in new image and i putting it here cuase i make so many images that no one is aware since the gdrive doesn’t notify so i will make post everytime for you guys.
anyway please change in your moonraker.conf file. or just dload this one
I love sharing and i have been releasing alot on facebook and the gdrive but it just gets buried so i am going to release everything on patreon for now on so new patrons can see everything and dont have to search through million posts or the gdrive . I will also be cross posting on my website which your patron logins will access and unlock . I will make some content public on here and the website but most will release here first for at least 30 days so that i can support you all better instead of getting swamped like i have been . Nothing against others i just have to put you “my supporters” first and with the gantry launch my time needs to go to getting you guys going with all this new stuff thats dropping over next week . Also jake allen will now have access to post content on the website and all my patrons will have access plus as the store starts generating revenue from sales i will try to support the contributors from my patron fund and from the store. I plan on carrying 3dxtech filaments and tungsten carbide nozzles maybe even …gasp the dragon lol but onyl parts that i personally test and can feel good recommending. I literally have gone through 10 dragons as shown in the video i just posted.I destroyed a few of them and it turned out it was the dyze nozzles fault so I emailed them and if they revise the nozzle i will recommend and possibly carry it but as of now i think spool3d and 3dmaker are the go to for wc also i am waiting for a midwest tungsten nozzle to test but the 3dmaker seems the way for us and spool3d for canada and either for rest of world. Lastly we will be adding a tip the designer system for contributors on the website as designs start getting posted. I will not allow anything to be sold i haven’t printed and tested and i will be really leaning towards a free market for all my patrons with the option to tip and to rest of public they can charge what they want lol. Also all my content will be free for you guys as long as no one tries just pledging a dollar and dloading stuff then canceling which if that happens a few times ill have to set some min lifetime pledge for full access but i have had nothing but good experience from all of you .
Jake allen redrew my last version adn tehn me and him tweaked it until no end and it is really the ultimate iteration at this point. Their is 2 versions here these are meant to work with the ldo and origianl bom size bearings “14mm” i am testing the vivedino 16f front bearing version and will add that shortly
This is a quick guide to show how to fix your install, if a new update caused a version mismatch.
There are pretty standard guides, but most leave out that with input shaping and other advanced features, we have to also compile the microcode for the host controller, a raspberry pi in most cases. I may be adding a guide to use a tablet as the Klipper host in future, so that we could use an old tablet to control the printer, and just use the Duet spi bus, so we could mount a nice big tablet or old laptop, etc, onto the printer and have it complete standalone. Below is a list of commands to use for anyone feeling a little overwhelmed, but it’s much cleaner to follow this video.
Tips:
To enter a previously entered command, press ↑ on your keyboard. You can cycle between options with ↑ and ↓
To copy text inside a PuTTY terminal, just select it.
To paste, right click
Directions:
Open PuTTY, and connect to the raspberry pi with your IP address. (mac can use the ssh command)
Login to your pi, default is pi and raspberry
Enter cd klipper
Enter make clean
Enter make menuconfig
Select Micro-controller Architecture
Select SAM3/SAM4 (Due and Duet)
Select SAM4e8e (Duet Wifi/Eth) inside Processor Model
Ensure that (USB) is selected inside Communication interface
Press Esc then Y
Enter make
Enter sudo service klipper stop, enter your password
Enter ls /dev/serial/by-id/*
Copy the serial by just selecting it in the window
Enter make flash FLASH_DEVICE= and paste your serial after the =
Note their is a chance that flash may fail and usually this will place the board into a bootloader mode like original install does when you hit the erase pins. If this occurs please rerun ls /dev/serial/by-id/* so that you can get the correct serial and use this one repeating step 10
Enter make clean
Enter make menuconfig
Select linux process inside Micro-controller Architecture press Esc then Y
Enter make
Enter make flash, enter your password
Restart the klipper service in the mainsail interface
You guys own the folder but it doesn’t show in your shared with me since it’s yours so you need either search your name or owned by me on the search bar. So what you do “Sean greenes idea” is you search your name on Google drive and then right click and set it to starred so now it will show on left next to all the shortcuts. You could always make a shortcut somewhere on the computer to but this is the easiest solution.
I moved the folders to a parent directory so no one else can see your folder anymore. When you join you send me message with your email you use for gdrive or gmail and i will add you to the gdrive and also make you an editor of the public uploads. Then you make a folder so you are the owner and it just uses my storage and gives me access then i will move it to the parent directory so it becomes private.
so you make a file with your order no personal info just your order and i can let you knwo progress in the text file and then when its done we delete it. This way your address and stuff go in the private folder but the orders are all right in one place for me so i dont miss any by accident. This will be until the webstore is working
A few months ago, I got the idea for a dual extrusion setup that would reuse a lot of the stock components, and talked to Tom Jones and a few others about it. I also had been working on cable chain modifications and fixing the printer’s other shortcomings. The dual extruder got put on hold because the stock Troodon board was limiting.
I focused on Klipper and RRF3 while trying simplify things, to improve prints. I was able to get amazing prints, but it took excessive calibration and attention to detail. Most troublesome was the constant required attention. The main issue was the cable chain, which then magnified other issues, such as the play in the guide. This is all because of a few things, including partially user error due to lack of instructions. The stock setup has a long moment arm and adding the DDE (direct drive extruder) increases the slop, “depending on other factors anywhere from a little to a very large amount that manifests as banding and ugly walls.” So, fast forward I figured out Klipper and got RRF3 working properly, and during this I tried over 500 dollars in rails from Amazon and AliExpress to Hiwinn, Ldo and THK. I found that no matter what, if I lifted the cable chain by hand, I could measure close to a millimeter of deviation with a laser attached to the hotend. So I then talked to Tom Jones again, and this time felt I would be able to figure the control scheme out for the second extruder, without replacing the board. I also had been running my stock rail on it’s side. We proceeded to design a gantry upgrade that incorporated the New 2.4 belt path that I had been running a version of, with a floating rail to reduce weight. Also we stepped up the size of the rail to increase accuracy at the same time. My main goals were that I wanted to not lose build space, and I wanted to have the dual hotends weigh close to or less than the stock . We achieved the goal, but we still had the crap cable chain.
Now Jake Allen was back to the group as “He bought a Troodon since he previously had one at work, but then no longer had access so he had stepped back.” He wanted to collaborate, so we sent him everything and I started working with Jake and Tom at the same time. However, we had different goals in mind. He wanted “modular with single hotend”. So early on, he asked what guidelines I wanted him to adhere to, so I told him to just keep everything somewhat compatible with each other, and try to minimize weight and loss of build area. It quickly became apparent that it could not happen that way, with a modular design, so I said, “let’s just continue developing both and figure it out,” but every time we updated the mounts or design, Jake incorporated it into his. Around this time, Tom got much busier and I said I need to just do the cable chain, since it is stupid to do this in two steps, it would be waste of work and money. Jake then made a parametric version of the Panzer chain, and I worked out a path and hacked some mounts together. I was able to get it up and running after a few iterations, which proved the wires were long enough if we were creative. Jake then helped me clean up the files and kept teaching me more CAD tricks and commands. So now we had two viable designs. One was a mosquito-centric, but dragon compatible, single hotend setup that could support two fans and a second hotend on the front. This was a jack of all trades, but it was heavier and you would lose around 35-y off each hotend. If you needed to use the supports for the full print, it would lose a lot. I was worried about the plastic mount for the hotend, but it seemed good for someone not really planning on using dual extrusion except occasionally. The original design at this point was able to run dual extruders, with no loss of travel on the main hotend, and 5 to 10 x less with the second hotend. However, it could not support 2 fans and the parts were not modular, “Meaning, a fan duct for one side could not just be mirrored and mount on the other,” but I felt that if I am printing the parts for add-ons, it doesn’t matter to me if I have to design different hole patterns for different sizes. So it was now where one design did what it did better, but the other did more things. So as always, it was either more flexible, or better performance with less options. We had tried the dual setup with Jake’s side by side, but it had to be spaced really wide and it seemed not viable.
We kept working and Jake has had nothing but bad luck with his genuine Mosquito, so he said, “I am done, I’ll just go dragon, we can just do yours and Tom’s for everything.” I hated the way he sounded, as I knew he was bothered. In past I have talked to Tom, and was just talking to Theodor Lasenko the other day, where I mocked it up on a screenshare with the hotends turned 90 degrees. Turned out, the mosquito could mount just as close as the dragons. Funnily enough, Jake had just turned the hotend 90 degrees on his mount too. Then the last thing happened, which was that Berd-Air become viable. A lot have posted online having loud noise, and bad performance but after a lot of testing I found settings for the pump that are great, and between that and a few other tricks, I can print 85 degree overhang with Berd-Air. So end result is that Jake has decided to just jump back over, and we will add mounting holes for a mosquito so now its one design that makes it cheaper for all and just is simpler in many ways. It’s already daunting having a fan duct, a Berd-Air mount, two types cable chains (stock and Voron style), two BLTouch mounts, etc, so we finally are ready to take a tally for orders and place the order. I am working on a full bill of materials, so I can figure out what the upgrade actually costs when all the bolts, etc, is accounted for, because I have tried a lot of different things to arrive at the final bill of materials. Also I have about 30 hrs in on last mounts and 20 hrs in on the newest cable chain brackets with optical endstop, and it seems rock solid.
Fan duct style stls
Berd air with Bl touch on the side
Bl touch in the back for the fanduct variant . They both use the same metal carriage and hardware, just different prints.
I am also making some more changes to the orbiter for ease of printing and to it mount better.
well i decided to take crash course in javascript and i ripped the marlin generator source code and changed it for klipper and rrf so i made two versions that are native for the troodon or railcore or voron and reall can work for most printers on klipper or rrf . It is under the tools tab on the website. Advanced3dprinting.cohttps://www.advanced3dprinting.com/tools/
This is a basic guide on making a PA (Pressure Advance) gcode file. I plan on forking the code and changing it to natively generate the gcode for RRF and Klipper, but it’s easy, so I am not making that a priority. Just use the above-linked tools.
Generate the gcode for marlin inputting your settings for the filament and nozzle you are using. You want .005 steps ranging from 0 to .1 for most nozzles and filaments. If your filament is very soft or your nozzle is small, then .2 may be better as a maximum value.
Add a G32 after the G28 in the side panel.
Add a T2000 after the P500 on the acceleration line.
Download and open in notepad, or some other simple editor that does not format text.
Use find and replace to find M900 K and replace it with the respective values:
Klipper is SET_PRESSURE_ADVANCE ADVANCE=
RRF is M572 D0 S
Save the file, making sure the extension is .gcode.
Upload to the printer and print.
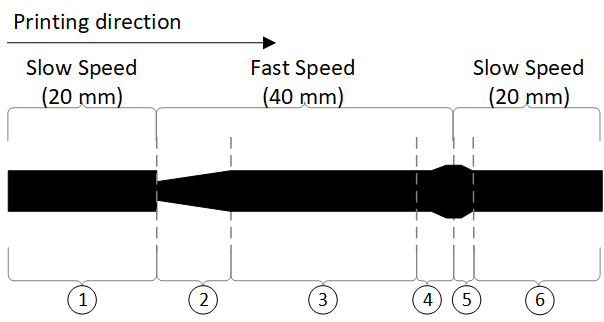
Find the line that stays most uniform at the speed changes marked by the top two vertical lines.
Enter the corresponding value in your slicer’s filament gcode override. If slicer does not have that, then enter it into your start code and name that profile for the filament you calibrated.
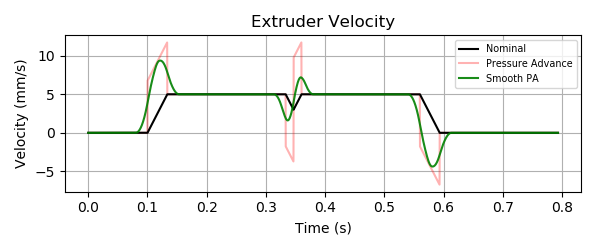
I found some cool diagrams that show the improvements with Klipper pressure advance compared to regular Linear Advance (LA) and PA with the smooth pressure advance algorithm. With direct drive, it does not matter as much, but with Bowden and high values, Marlin and RRF have a hard time keeping up and end up slowing the print a lot to maintain the max acceleration for the extruder in firmware. So, a stock 300 really needs 1.9 and that doubles print times on RRF. With Klipper, it is not a problem and it does not reduce the acceleration as the extruder hits its ceiling. Instead, it smooths out the max values and extends them slightly to the same end result. You can configure the smoothing time if you really are pushing things, but the stock value is adequate. We do not want to reach the point where we start reducing the effectiveness of the pressure advance. This all is not important if running direct drive since we rarely need more than .1 seconds of Pressure Advance with the Orbiter or most other high-end solutions. I just figured it would be interesting to give some background on what is happening under the hood.
These are the install instructions by Alex Or. He has done all of us a huge favour. I will be sending this to anyone who purchases a harness or kit, this will also be available to my patrons.

 Unlock with Patreon
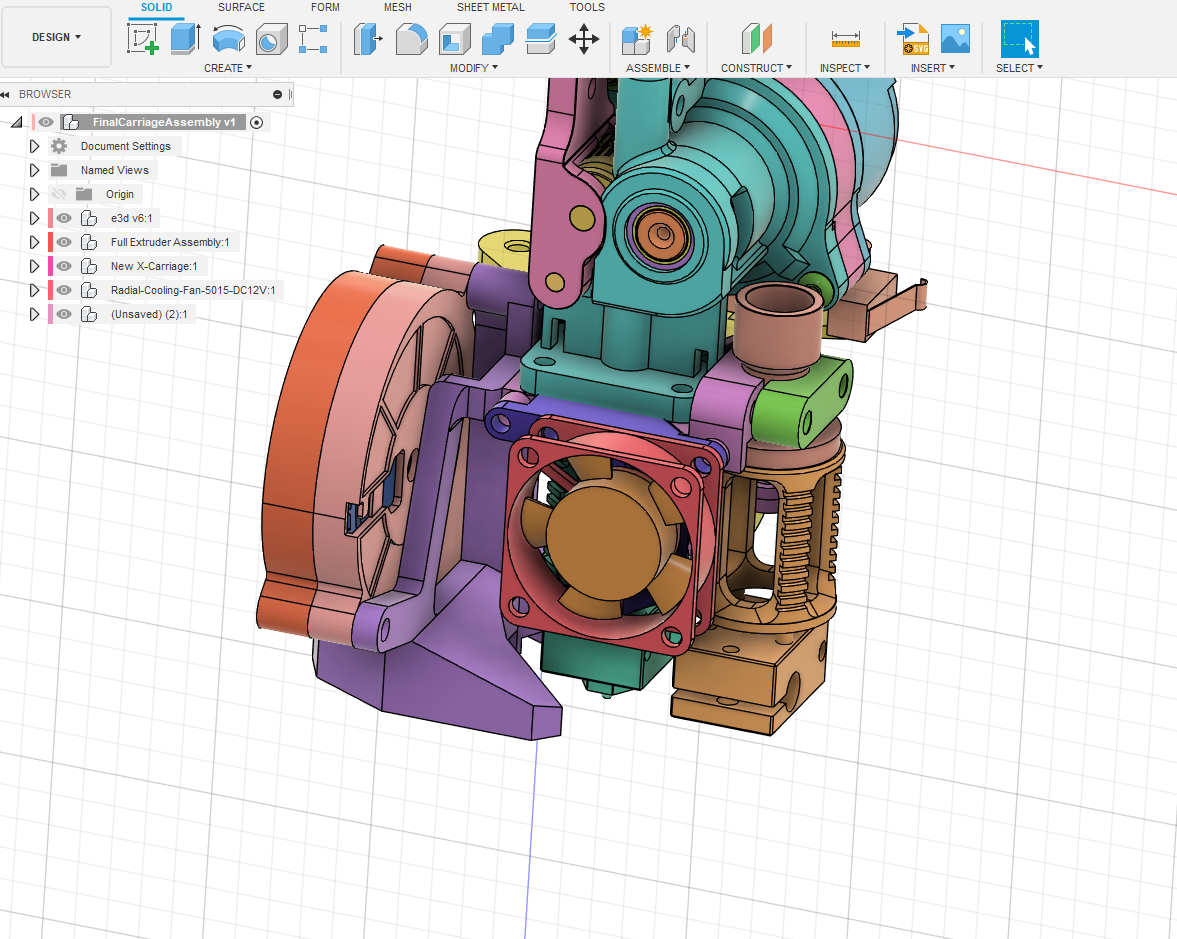


